New Fuse Block, April 24, 2021

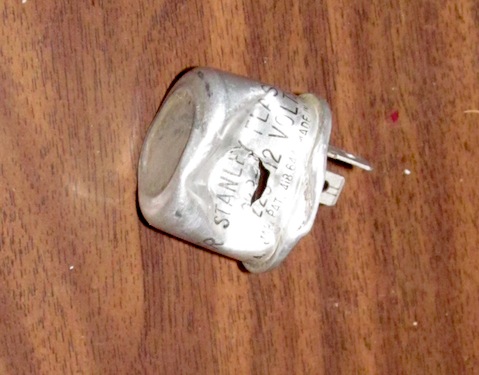
So when working on getting the head and tail lights working last weekend (April 17) squeezing the front brake lever a couple of times worked until there was a frazzling sound & about half power to the brake light. Keying off power and then on again had it working again. Unfortunately while looking at the rear light wiring I heard a small pop from somewhere about the middle of the bike and lost all 12 volt power – so no more blinkers, no more brake light.

Working through the harness showed there was still 12v power off the DC-to-DC converter, and on the line to the ignition switch, but nothing anywhere else. Considering the harness is 38 years old it seemed a good idea to simply rewire from scratch instead of trying to chase down the exact point of failure as when fixing one bad wire there are more waiting to rear their ugly heads.

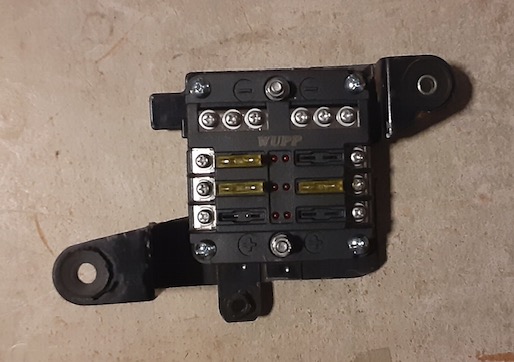
So, to start the re-wiring process i pulled the old harness, clipped off a few connectors that i can re-use, and started laying out new wiring runs, and then figured how out to mount a new fuse block. Sourced from Amazon the 6 circuit block has a common negative bus bar with individual positive circuits out. It took a little bit of finagling but figured out the easiest way to mount it was to take out the existing fuse mounting area on the left side, trim off the brackets to make it flat, and then drill mounting holes. New positive wiring comes into the sides, 12v power in from the bottom, out the top to separate negative lines.

The Ring Vent (October 6, 2013)

After putting eveything back together several times, most recently with the radiator hose air boots, I was able to ride the bike, sync the carbs to proper inches of vacuum (10) and feel pretty good.  Until I’m standing there listening to my happy idle and I hear a slight pop and a continuous hiss.  Putting my head too close to the engine I can’t find out where the sound is coming from and I burn my nose.  Looking at my carb sync gauges I note that my vacuum pressure has dropped from 10 down to 5 – on all the gauges.  Great.  Another major vacuum leak.  Frustrated, and hot since it is over 95 d f outside, I called it a day and put everything away.

The next morning (October 5 for those of you following and counting days like sheep), I pull the bike back out and try to figure out where the vacuum leak is.  Start up the bike, let it idle for a few minutes to get stable, and start spraying around the carb boots and intakes with WD40.  What do I find?  Nothing.  Absolutely nothing.  No engine surge or change in RPM.  Just WD40 dripping off my now hot engine …

Then I remembered something I saw on the web about a guy having a problem when riding and when he opened the gas tank he heard a WHOOSHing sound.  Hm…. My gas cap has made that sound plenty of times … So I get my gauges back out and hook one up.  Restart the bike, 5 inches of vacuum.  Open the gas tank cap while bike is running and BAM BAM Pebbles.  The gauge climbs to 10 inches of vacuum.  Stupid gas tank cap.  Looks like the gasket seal is bad.   These are $10 (cheapest) on ebay.

So I take the gasket out, visit Autozone, they have nothing.  Walk across the street and visit O’Reilly Auto, and they have gasket material.  So for $10 I get a bunch of different type of gasket material and I make my own gasket.  It is now installed.  Test start later today or tomorrow to see what happens.

Carburetor Hosed Boots (October 3, 2013)

So in order to avoid being known as “Bleeding Knuckles O’Leary” for my carburetor airbox work I figured replacing those 30 year old air boots would be a good idea.  Now a set of 4 of those things runs about $40 on ebay, or more, and there’s no guarantee used ones won’t be just as hard as the ones I already have.  New ones tend to be a bit more expensive but could be servicible if they haven’t been sitting on a shelf for a long time.  I generally prefer to avoid NOS (new old stock) items that have been sitting on a shelf due to previous experience with rubber products that look good but have structurally deteriorated due to non-use.

So what to do?  Google.  Found a video on youtube where a mechanic used a radiator hose, cut to fit of course, to connect his single carburetor to his air box.  Autozone carries a radiator hose of the appropriate diameter and long enough to cut into 4 pieces for $10.  Just remove the inner support coil, measure twice, cut once, and then fight the install.

What did I just learn?  The airboots on my bike aren’t actually the same size.  They look like it in the pictures but the two outside ones are 47 mm diamter and the inside two are 39 mm in diamter.  Stupid engineer who designed this ….

20131003_radiatorhoseboot_5749

20131003_radiatorhoseboot_5750

Air Bending Boots (September 28, 2013)

One of the problems with working with 30 year old bikes is working with 30 year old rubbers.  Note that said 30 year old rubbers tend to harden, and shrink, so they no longer fit right and are a pain in the nether parts to remove and reinstall.  One method of softening the hard rubber air boots that join the carburetors to the air box is to blow hot air on them with a hair dryer.  This will soften them, i.e. make them flexible, so they are easier to install.  Unfortunatley they only retain the flexibily while they are warm.  As they cool down while you are trying to install them they will stiffen up and be next to impossible to install without using the hair dryer outside and holding it with the 3rd arm and hand you had to grow through evolution just for this purpose.

20130928_airboots_5578

The Duke of Hazard Flasher (September 27, 2013)

Note to Self:  Be careful when working around carbs with the seat open.  If you close the seat make sure nothing that can be damaged is hanging around the seat supports or frame, especially when you are closing the seat to lean on it for leverage.  Fortunatley this is only my hazard flasher and not the regular blinker (turn signal) flashing unit.

20130927_hazardflasher_5564

Carb Flap Fix (September 25, 2013)

Waited over night for the JB weld to dry.  The flaps came out good & except for #3 installed well.  Note to Self:  Do not cover thin silver flexible strip and ballbearing on back with JB weld.  This needs to flex as the flap slides down and into the carb body.  Had to cut out the extra JB weld so it would operate properly.

20130925_flapsfixed

Carb Assembly (September 23, 2013)

Finished putting the cylinder head, camshafts, chain, and cover back on yesterday & am now putting the carbs back together.  Bowls floats and needles have been cleaned and reinstalled so now I just need to finish the top end.  Working on the missing flaps on the slides & am wondering if I should even bother installing the slides.  It’s not like they’re really needed in the first place when they have holes in them.  But, just to give it a shot, I took a couple of picture frame holders and snapped them down to the right size and put them in the slides & have them held in place by the existing springs.  See picture.  Now how to keep them there?  J&B weld.  Covered over them on both sides & am waiting for it to dry so I can sand any rough edges down.  In the meantime what to do?  Go to autozone & buy some motorcycle oil … tomorrow.  Reinstall everything on Wednesday after the J&B weld has had the proper drying time and is checked for fit …

Note in the picture the middle two slides have the replacement flaps.  Outside two are the originals.  Pre-J&B weld.  Pics of the J&B weld fit tomorrow ….


20130923_kz550_carbflaps

Engine Assemble! (September 9, 2013)

Started putting the engine back together today.  Made good progress until I went to tighten down the cam cover & was torquing the 1st bolt with my torque wrench.  Broke the bolt  … in the hole with the cover on and all other screws hand tightened.  New gasket installed with gasket tack.  Great.  Get to take it all the screws out tomorrow (just from the cam cover), buy an extractor set, and hope the gasket is quite reusable.

In better news it will be on to the carburetor after that.  hopefully later this week I can try putting it on & seeing if it starts again.  Without breaking any more bolts.

Valve Compression Tool Insall (September 3, 2013)

Finally had the time to modify my valve compression tool & use it to reinstall the valves & the keepers.  The keepers are the hard part.  Always wear safety goggles when doing this.  The springs can uncompress quickly when the tool slips & you’ll get a socket, keeper, spring, or something in the face at a high velocity.  Despite 4 or 5 spring incidents I was only hit in the face twice – once in the lip with a socket and once between the eyes (but on the safety goggles) with the valve cap.

Note the tool is the same 8-inch c-clamp from harborfreight – just cut a piece of 3/4″ pvc conduit to a useable length, cut out a section (pipe cutting tool & huge pliers to break it off).  This works like a charm.  The pvc is a little flexible but that helped in my case to spread the load & not scratch the aluminum engine block and the hole I made in it is much easier to work with.

20130903_valvecompresstool_4817

Valve Cleaning (August 25, 2013)

Started cleaning the valves the other day, then googled & found a youtube on how to do a better job of it with a power drill and some fine grit sand paper.  Note the difference, before on left, after on right.  After getting the build-up off you can see the pitting that’s occurred on the valve.  Also noted the inlet valves are slighting larger in diameter than the outlet valves.

20130825_kz550_valveclean